A finished creative is only useful once your team can test it.
Your creative team has finished six new hooks. The files are approved, but the tests are waiting for campaign setup. By the time they run, another batch has arrived and the team is already asking which ideas deserve more production time.
Getting assets into delivery is only half the problem. If naming, audiences, or reporting windows differ between batches, the later comparison becomes harder to interpret. A useful creative process connects the brief, the approved assets, the launch setup, and the evidence review.
Make the handoff from creative to campaign repeatable
Superlaunch’s Launcher supports approved creative versions, collections, and reusable templates. Your team can use that structure to prepare a batch, review the proposed campaign, and repeat the process on a schedule. Insights then gives your agent the data for a consistent review of what delivered.
Test a new batch of product hooks each week
Your creative team produces new versions for one product and market. You want to run them with the same campaign setup, avoid selecting old assets again, and use the results to brief the next production cycle.
The following is an illustrative workflow you can adapt to your account.
From source files to a running launch workflow
Bring in the files from your computer or Google Drive
Imagine a weekly batch split between a designer’s exported videos and a shared Google Drive folder. Open Launcher’s creative import area to bring those files into Superlaunch. For a file on your computer, choose Upload files, select one supported image or video at a time, and wait for the upload to finish. The file chooser accepts JPEG, PNG, WebP, MP4, and QuickTime. The uploaded media is then available to add to a draft creative in Library.
For Google Drive, connect the source and select the files you want Superlaunch to use. You can add the import to an existing active fixed collection. Choose Import selected files and follow the per-file results while the import runs. A Drive import creates media and draft creatives, so you review and complete those drafts rather than creating the same creatives again. Importing a file does not approve it for launch.
Drive access applies to the files you select. Choosing a folder does not share all of its contents or automatically import next week’s files. Select each new batch. If you are working through an agent, complete media intake in the browser, then let the agent use the uploaded media and creative identifiers.
Turn the assets into creatives your team can approve
A video file is an asset; a launchable creative also needs the advertising content that goes with it. In Library, create a draft with your uploaded media, or open the draft from a Drive import. Complete the ad copy, headline, destination, and other required fields. Give it a name your team can recognize in later reviews.
Review the version you intend to use and choose Approve whole version before launch. Approval covers the version’s language bundle. This creates a clear handoff: the creative team signs off on the actual content version, and the buyer selects that version for the campaign. Do not assume a new edit has the same approval as the version your team already checked.
Create a collection for this batch or a repeatable selection
Create a fixed collection when you want to choose the exact creatives for a specific batch, such as this week’s approved product hooks. Use a smart collection when you want saved matching criteria to select eligible creatives. Preview the collection so the team can see which assets match before preparing a launch.
The distinction matters for recurring work. A saved fixed schedule retains its selected membership; editing the collection later does not silently update that schedule. A smart schedule uses its saved matching criteria to find eligible creatives. When the testing plan changes, review and update the schedule’s selection rather than assuming it follows every collection edit.
Save the campaign setup in a template
Create or choose a template for the selected ad account. Configure the campaign objective, audience, placements, destination-related settings, naming, and budget appropriate to the test. Select the template version you want to use. Set the account’s Launcher campaign and budget limits before the first launch preview.
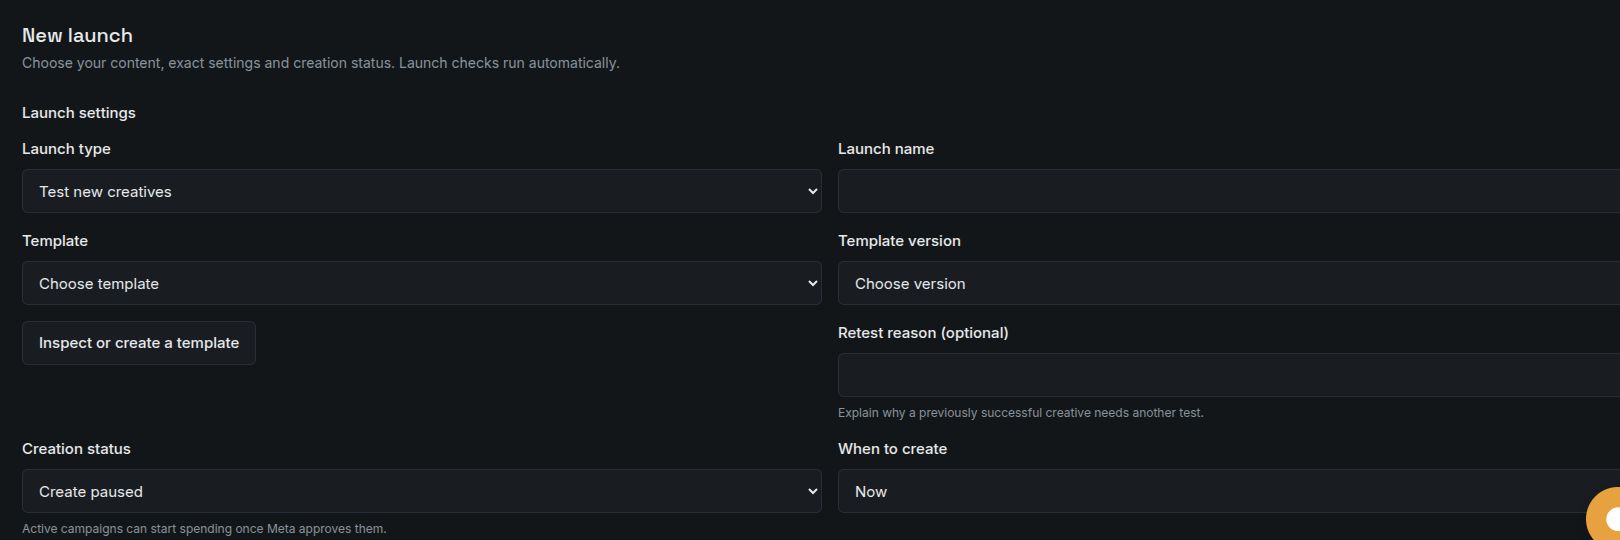
The template removes repeated setup, while the preview gives the buyer a chance to check the actual batch. Inspect the proposed campaign structure, selected creatives, and budgets. Choose Create paused if someone should review the campaigns in Meta before activation.
Run a one-time launch now or at a future time
For a product promotion or a single creative batch, prepare a launch with the chosen template and creatives. In When to create, choose Now to submit it for creation, or At a future time to schedule that one launch. The future-time control uses your browser’s time zone. Review both the creation time and the creation status.
Those settings answer different questions. A future creation time controls when Superlaunch creates the campaigns. Create paused means the new ads remain paused until activated; it is not an instruction to start delivery at the creation time. After submission, check the execution result and any failed items before calling the launch complete.
Create a recurring launch for the next approved batch
For an ongoing Test new creatives workflow, choose Repeat automatically. Recurrence supports collection-based testing; promotion and refresh are individual launch operations. Choose a daily, weekdays, weekly, or advanced cron schedule. Set the time zone, maximum creatives per run, and maximum exposure per run. Review the saved template version and creative selection before enabling the schedule.
Each occurrence selects eligible unused creatives from the saved selection. A smart schedule can pick up newly approved creatives that match its saved criteria; a fixed schedule retains its selected membership. Later template edits are not adopted automatically. Overlapping and missed runs are skipped, so inspect the run history instead of assuming every calendar slot produced a campaign.
For the weekly hook-testing example, the team selects new Drive files or uploads local media, completes and approves the resulting creatives, and checks that they match the smart schedule’s criteria. The buyer reviews the scheduled run and its result. Pause or update the schedule when the account, offer, or testing plan changes.
Use the results to decide what to test next
Once the ads have enough delivery, compare their results in Insights using equivalent reporting periods, the same conversion event, and consistent attribution settings. Ask your agent to flag creatives with too little spend or delivery to support a conclusion.
Launcher also offers Promote successful tests and Refresh an existing ad set. Use those when you want to carry selected test creatives into another launch or introduce selected creatives into an existing ad set. A successful launch means the creation completed; it does not establish that a creative is profitable. Let performance evidence and the team’s judgment guide what you promote.
Start the conversation with your agent
Adapt this example to your account and the task you want to review.
Preview the approved creatives in our new-hook collection. Prepare a paused launch with our existing test template. For the last batch, compare spend, clicks, and tracked conversions over the same period. Flag creatives with too little delivery to judge.
Before you rely on the result
This workflow standardizes creative launches and comparisons. It does not create a randomized A/B experiment or establish that a creative caused a performance change. Audience, delivery, timing, and attribution can affect the comparison.
A useful first step
Start with one product, one market, and a batch your team has reviewed. Keep the setup and review period consistent so you can learn from the process before increasing creative volume.
Your team has a repeatable handoff from approved creative to launch, followed by a performance review that can inform the next brief.
Read the setup documentation